Friday, November 29, 2013

DIY KNITTING!


I am sharing one of my new-found interests; knitting. When I decided to start working with something from scratch, I actually had a hard time choosing between knitting, crochet, or sewing. Given that sewing takes more investment to start, I decided to narrow the choices (although a sewing machine is on my next year Christmas list!). Ultimately, I chose knitting because of its versatility and the challenge that comes with it.

I will be honest, learning the techniques was difficult. I did not take any formal training or knitting classes so my source was YouTube. I did not want to take any classes until I knew I could get the hang of it.

In the picture above, I have included some of my first projects. This is a perfect time to learn how to do this to make many beautiful and simple stocking stuffers or office gifts.

For first-time knitters and low-budgeters, I have decided to create my list of things to do when you start so you are not completely in the dark. I am still learning myself but I think it is helpful to learn from a person who started from no knowledge when you are in the same place as well.


Step One: Choosing Beginner Yarn

1. It is important to realize that your first project will probably be a scarf. It is straight with no hard patterns and easy to learn repetitions. Therefore, you will
need at least one ball of yarn to begin.

2. There is so much yarn to choose from but it is necessary to consider the weight and the thickness. Beginner yarn should be worsted or 10-ply yarn.

3. You want to make sure your first yarn is very simple and not very sparkly or multicolored so that you can see the stitches well. Plus, you want the yarn not to have multiple strands or bumpy textures. I recommend wool-ease or cotton-ease for first time projects. From the picture above, my first yarn was the blue one. I then moved onto the wool textures and loved it since it was quicker and softer to make.


Step Two: Choosing Beginner Needles

1. When working with something simple like a scarf, you will need single-pointed needles. These needles are sold in a pack and have one end that is pointed and the other end with a knob attached. There are also double-pointed needles, cable needles, and circular needles available for making things like hats, gloves, sweaters, etc. I have no experience with double-pointed or cable needles yet, but I did try circular needles when making a hat. They look like this:

        Basically, two needles attached to a flexible plastic cord. I recommend learning with a single-pointed needles set and then buying this later on if you are interested.


  2. In the picture above, I also have included a small needle big enough for the yarn thread to come   through. These are found in the knitting aisle as well and are very important as a beginning purchase. They help you finish of the scarf in the last steps. Some people prefer a crochet hook for this job and you can buy that as well.

3. It is also very important to consider the diameter of the needle. Basically, the thinner the needle, the tighter and less flexible the stitch. I recommend that a first-time knitter should buy a diameter around 5 mm to 8 mm. The standard size is 5 mm. This will be easier to handle and allow more flexibility without very loose stitches. One thing to understand, each needle has a number on them and that is not the millimeter size. It is the American measurement and is not usually what I follow. However, just to let you know, a size 8 needle is 5 mm and it will usually say that under the number. My first needle pair was 3.75 mm and that was probably what added to my frustration on getting the technique. In the picture below, I have  3.75 mm, and an 8 mm. I liked the 8 mm much better. 


4. There is also the length of the needle to consider. The length should not be to big or to small to allow maximum comfort. I recommend anywhere from 10-16 inches, which is the standard size.

5. Since no one told me about the different needle materials, I went with metal and I really like it. However there are four different materials to choose from; wood, plastic, metal, and bamboo. There are plenty of pros and cons on each so I just say do your research and pick one. I heard good reviews on bamboo because the yarn does not slip and is lighter than metal but they can break if the circumference is to small.   


Step Three: Starting the Projects

1. Like I said earlier, my sources of learning was YouTube. I have included some links that I used to make it easier for you to find the proper techniques.

How to knit (These are a series of different ones)  http://www.youtube.com/watch?v=G9hv44QwQ-A
 http://www.youtube.com/watch?v=Tff3ng-djtk
http://www.youtube.com/watch?v=ONVQCK_-rKc

How to circular needle knit http://www.youtube.com/watch?v=8LB__4WhGY4
http://www.youtube.com/watch?v=L_hl7HGMDy0

2. Local crafting stores hold knitting classes often. They are only one day usually and you can grasp the techniques very fast and effectively. Look into Jo-Ann's or Michael's Store Websites.

3. Know of any friends who knit? Get a group started. Everyone can bring their knowledge to the table and you will build and strengthen in learning together.

Encouraging Closing Statements

Knitting is soo easy once you get the hang of it. It is just one continuous repetition after another. As you get better, you can learn new techniques and use them interchangeably to create pattern on your material. I admit, starting it was hard. I had to rewind videos over and over again because they were going to fast for me to understand it! If you get to frustrated, put it down and try it the next day. I promise as soon as you get the technique down, you will be able to do it with your eyes closed (though I do not recommend it :)).

Wednesday, November 20, 2013

DIY Inexpensive Chalkboards!


This DIY project is perfect for this season! It makes great gifts for children to play with, mothers to write grocery or chore lists, and a wife and husband to exchange little love notes to each other. There are tons of other things to do with blackboards! The best part is that they are very easy and inexpensive to make. I liked to do it so much, that I made two of them; one for my daughter and one for a Christmas present!


You will need:
1. Chalkboard paint. This paint can be found at any home improvement store like Home Depot or Lowes and most other large stores carry them too. We got this paint at Walmart. This is a spray paint but there is also cans of paint available for those who prefer it. The price is around $3-$5 a can and you can do up to 4 frames that are 16x20. 


  2.   You will need any type of picture frame that is plastic-backed. The chalkboard paint does not say anything about working well on glass but I tried it on glass and it works well too. A good size would be 16x20 but smaller ones like 4x6 are cute and you can pin it in the kitchen for to-do lists.

These picture frames can be found easily. Most people have picture frames stored in the basement or in the garage in hope that they will be used again (but it never happens). Therefore, hunt through the boxes and find some. You can also find some at thrift stores for an excellent price. I had a picture frame that was a little bit scratched up and not very interesting. I had some blue acrylic paint lying around and I used a piece of kitchen sponge and dabs of paint to create a beautiful appearance! My husband also spray painted the frame of another picture the color silver with a spare can he had lying around.

Another possibility would be to buy a piece of plywood from a store like Home Depot and use that instead of  the glass or plastic. I bought a sheet of wood for about $10 and had it cut right at the store. (I can use the extra wood for different projects too). The thickness was about the same as the glass and cardboard patting would be in the picture frame so I took those two out and used just the plywood. Wood is a good alternative if you have children that draw very aggressively on the boards and you do not want them to harm themselves.


Directions:

1. Unfortunately I do not have any pictures of the process (sorry!) but it is a very simple and easy technique. Make sure to do this outside because the paint does smell.

2. Lay out some newspaper or plastic bags on the concrete. Slide out your glass or plastic from the frames (or take your piece of wood) and lay it down. Makes sure you dust of the material before you start spraying. I also recommend sanding the wood a little with some scrap pieces of sandpaper but it is not required.

3.Then, following the directions on the can, spray about 8 inches from the surface in a consistent motion from top to bottom. Repeat about 2 or three times, depending on what material you are using. Plastic usually takes fewer coats and wood takes more. If you are using a paintbrush and wood version, use nice and even strokes following the grain of the wood.  If you can not take out your glass or plastic from the frame, make sure to cover up the frame with tape.

4. Let it dry for about 24 hours before using (or follow directions on the can). Slip it back into the frame and viola! Simple and easy! 


Thursday, October 17, 2013

DIY Project: Bridal Shower Favors on a Budget

My beautiful friend recently got married and I had the honor to help her bridesmaids with the bridal shower decor. All of my supplies were purchased at the dollar store and created a charming accent to the center table. However, I did buy the candy from a grocery store because they have a better selection.


The items purchased were:

  1. Lace circles (12 in a pack)

  2. Ribbon in assorted color, which I have a lot left over to use on gifts for other parties and celebrations.
  3. Pink shot glasses. These have a different purpose usually, but why not use them for simple decor?


I also decorated candy bars with personalized stickers that you can put through your printer. Microsoft Publisher has the template. (I have publisher 2007). And yes, they were also from dollar tree!


One thing to be aware of at dollar tree is that there decorations and supplies slightly differ for each season. Those shot glasses were available for the summer but not for other seasons. Typically, you can always find something else to use. When I found out about the engagement, it was around Valentines Day. Therefore, there were heart decorations and a lot of pink items. I stocked up on heart confetti, pink streamers and other decor while it was avaliable. Stay tuned for more DIY Projects and Fun!

Thursday, September 5, 2013

Easy and Delicious Family Tacos!

These tacos are so good and so simple that they are gone within minutes! They are not Mexican style tacos, they are more of a snack that do not have any spice but plenty of juiciness! My family has been making these for quiet a few years and we all love it!


Prep time: 40 minutes               Cook  time: 3 minutes


You need:
  1. Large Flour Tortillas, 8-10 Count. You can use whole wheat or flour.
  2. 1 pound of ground meat, I like to use ground turkey for extra moistness.
  3. I medium onion chopped into small pieces.
  4. Mayonnaise for spread.
  5. Shredded cabbage or lettuce, whatever you prefer.
  6. 1 large red pepper, chopped into small pieces.
  7. Mozzarella or montery jack cheese, shredded.
  8. Some toothpicks to hold taco together. 

Directions:
  1. Fry the ground meat in a pan with oil, salt, and pepper until brown. Add the chopped onion and saute for another three minutes. Transfer to some paper towels to cool and drain the oil.
  2. While the meat is cooling, spread a layer of mayo on the tortillas.
  3. Add the meat mixture, lettuce or cabbage, pepper, and cheese on top. close the two flaps of the tortilla and hold together with toothpicks is necessary.
  4. Store in the refrigerator with plastic wrap over them. When you're ready to make some, add a small drop of oil to a pan and fry on both sides until brown. You can also cut up in pieces and stick a toothpick in for a great appetizer with a ranch or salsa dip.  But I love to eat them whole! :) Enjoy!


Thursday, August 29, 2013

The Significance of Color and Impact on Feelings

Next to listening, non-verbal communication ranks high in the skills of communication. 93% of the way we communicate is through non-verbal communication; therefore it is important to understand how we can better understand the use of this fundamental aspect. Understanding color communication is a key element that helps establish a better understanding of the many approaches of non-verbal communication and it helps establish our mood, feelings and actions. We are participating in the complicated, yet required way to communicate every time we chose a red dress for a party because it is more eye-catching or when we choose the pale blue paint for our room to help us sleep better. Colors are everywhere, and like communication, it is inescapable. Color is not just seeing the basic colors of the rainbow. There are so many tints and shades of many different types of colors that work together to create an impressive picture in our mind.


From our first grade education, we can never forget the traditional yellow, red, and blue primary colors. The secondary or complementary colors are two primary colors being mixed together. White is the presence of all colors, black is the absence of all colors. Even from a young age, an infant can categorize colors between two. Why can infants who have a low understanding of the world find a red ball more attractive than a black one? Their eyes are attracted by the brightness, the darkness, or the contrast of an object against its surroundings. We know that colors are something that we cannot escape but also we make every color symbolize its own unique trait and feeling. To better familiarize with our surroundings and feel more comfortable in our environment, we identify things with our senses. We communicate these feelings or attitudes toward something in everything we do. Colors are a big impact of the way we feel and act towards anything we do.


Psychologists have proved that the cool colors such as the blues, greens, and violets which make us feel more calm and relaxed as opposed to the warm colors such as the reds, yellows, or oranges that arouse our senses and make us feel more bright and cheerful. Everywhere we go, we experience color communication. Whether it is our old time favorite coffee shop or our local fitness center, we are victims of the color communication these companies have imposed into our minds without our own conscience knowledge. One of America’s favorite fast-food places is McDonalds. As a previous worker of McDonalds, I would try to bring food from home to prevent getting into the habit of eating that type of food. Unfortunately, every time I would come into the workplace, my appetite appeared even if I recently had lunch at home. The red and yellow walls in the McDonalds tend to indicate appetite and excitement. Vivid, warm colors like yellow and red cue speed and will cause people to eat faster, or at least give them the impression of speed.


In contrast, coffee shops are usually painted with contemporary colors such as dark brown, light grey or tan to give the impression of a relaxed environment where it is possible to sit and feel calm. The color brown is designed to appeal us to their product and to feel satisfied. I have always been interested in this topic.


At a wedding why does the bride wear a white dress? I always hear the relatives at every wedding exclaim to the bride, “You are as white and pretty as a pure bride!” What is it about the color white at weddings that provoke peoples desire to wear it? According to an article on Zimbio, “The color white has long been a symbol of happiness, purity, and even virginity in the Christian traditions.” When girls first married in those times, they were completely undefiled by the world and only become a “woman” when she was with her husband in full purity. Nowadays, this tradition is still used even though people do not know the true meaning. Others have started to replace the traditional wedding dresses with their image of the new decade dresses that feature dark colors with no white in them whatsoever.


Dark colors are meant for funerals because they are considered submission colors. They are symbols of sadness and of loss of a loved one. However black is the color of authority and power as well. It is popular in fashion because it makes people appear thinner while making them stylish and timeless. Therefore, black is popular color to wear to parties and as a business associate to present authority.


After a long day at work, we like to go feel like we are young again and we spend a few hours at the gym to get those muscles of ours to work. The gym is my least expected place where they would use color communication but as studies show, weightlifters are able to handle heavier weights in blue gyms. The color blue causes us to be more productive and will make us work harder. Out of all the colors, blue is the least appetizing so it makes sense why gyms would be blue. At any type of sports field, sometimes the opponents’ locker room will be painted a light or dull pink. We think of pink as a romantic color, but it is great to tranquilize people. It is painted pink so their opponents will lose energy.


My last topic that really interests me is when pregnant woman find out the gender of their baby, they will buy many blue or pink colored clothing to represent male or female like traits. Our society has automatically placed those two colors on those genders in a way of separation. From an article on the web, it states that, “In the 1800s, almost all babies wore white—in fact, parents back then were so unconcerned about distinguishing between the sexes that they outfitted their infant sons and daughters in dresses across the board. And even when babies started sporting colorful clothing in the mid-nineteenth century, specific hues were not identified as male and female” (color code). In the early twentieth century, the generally accepted rule was pink clothing for the boy and blue clothing for the girl. The reason is that blue, associated frequently with the Virgin Mary, was believed to reflect little girls’ purity and goodness, while pink, which derived from red, was seen as a better match for male children’s fiery temperament. However, by the 1940s, the society inversed this trend and positioned pink with femininity and blue with masculinity.


Color communication always changes throughout the years and throughout cultures. In some European countries, having light colored couches as opposed to dark was considered to be a symbol of poverty but here in the U.S different kinds of people have light living room sets. Colors also have the power to control our society with great power. For example, the red light on the stop signs has the power to control every car around the world to stop until the light turns green. The power of color influences us consciously and unconsciously. Now, next time I want to control something, I know the techniques of the power of our unavoidable color communication.:)


Tuesday, August 13, 2013

The Importance of Playtime for Toddlers

Playtime is vital for the development of a child. Playtime helps a child in many areas including emotional, social, physical, mental, and cognitive functioning. Having a toddler of my own, I want to stress the impact that a parent can have on a child by restricting playtime or neglecting to spend time with the child. Here are 12 of my reasons why playtime is important.


1. The toddler develops physically.
A child who is running around and jumping is strengthening all the areas of the body that will help with muscle control, flexibility, and balance. Plus, the heart pumps healthy oxygen and the skin and hair develops healthy follicles. What's more, the toddler will most likely grow up to be an active adult with less medical problems and greater health. There is less risk for obesity and heart diseases later in life as well.

2. The toddler has a better mood. Combine the physical exertions with the social interaction, and you got a happy baby! Studies show that better moods and regular playtime develops better behavior and less aggression in children.

3. The toddler learn how to interact. Toddlers can learn plenty from playing with others. They learn proper etiquette on how to play nicely, how to speak if they want something, and how to say please and thank you. A toddler is very self-centered by nature, and interaction helps him or her to realize that other people also have feelings and emotions. Shy children can also benefit from a close interaction with friends or family, thereby increasing confidence and trust.


4. The toddler improves imagination and creativity. Imagination is the best psychological development for a toddler. The child can learn hands-on techniques on how things work and build on that knowledge. They learn many things by opening and closing their toy car, looking at colorful pictures in a storybook, and stacking blocks or solving puzzles. there imagination when they pretend that the floor is "lava" or the tea cups have real tea is not just fun but very beneficial.

5. The toddler improves on language skills.
Toddlers learn how to articulate better and how to speak more proper within interaction. Plus, simple toys such as blocks or alphabet key boards can improve language drastically. Toddlers have the ability to absorb so many words and phrases a day, even through songs.


6.The toddler build on skills needed in later life Resolving conflicts, working in groups, and working through challenges are great ways that children learn the life skills.
Children also learn how to make decision, not to interrupt and speak kindly to get what you want, and be a leader of good. The child also learns about his or her surroundings better.


7. The toddler will gain cognitive excellence in school.
Toddlers who play will develop more brain cells and have a higher level of intelligence and reasoning. They will have better focus in school if given time for play. In their simple games, children learn the foundations for math, science, and English. They will not have such a hard time in school because of their high concentration and understanding of techniques and will have less drop-outs in their teen years.


8. The toddler will benefit from high mental functioning. We have all heard about those studies where children left neglected have very low brain functioning. Interaction is extremely important. Unfortunately with the rise of video games, televisions, and computers, children have showed a lower mental intelligence than ever. Children who have more playtime will be more prone to an wisdom and knowledge that surpasses those who lack interaction and support.

9. The toddler builds relationships.
Toddlers are very dependent to have comfort and encouragement. The child can learn how to find friends and keep them by learning the ways one is to interact with others. Parent relationships also strengthen during the toddler years if there is plenty of time allotted to the child and attention is given. The child learn signs of love and friendship and how to show affection by playing closely together with others.


10. The toddler develops intellectual and emotional skills In playtime, it is important for parents and close family members to engage with the child as much as possible. A child thrives on the support and encouragement of the mother and father. There are so many different ways that a child can learn intellectual skills. Music and songs from a singing bear toy or a toy turtle can help toddlers gain understanding. A parent who reads to a child can also relax and grow a deeper connection with each other.

Cranberry Swirl Biscotti

I received a wonderful cookbook from my father-in-law as a gift a few months ago. It has so many fantastic recipes, one of which I have included here. It is too good of a recipe not to share! It is made for new cooks and bakers mostly with over 400 recipes. There are helpful sections on everything from how to cut a mango (yes there is a great way to do it!) to how to make rising dough (I have always had trouble with this one!). Plus, the nutrition facts are written down for every recipe. The title of the book is Taste of Home; Cooking School Cookbook. Great for Grads, Newlyweds, and All New Cooks!

These biscotti are so good you will want to take them to all your gatherings, your tea parties, and even wrap them up as gifts! Plus, they are SO easy to make. If I can do it, you can do it. :)

Prep Time: 30-40 min                                  Total Time: 1 hour and 30 minutes


You will need:

Filling:
  1. 2/3 cup dried cranberries
  2. 1/2 cup cherry preserves
  3. 1/2 teaspoon ground cinnamon
Dough:
  1. 1/2 cup butter, softened
  2. 2/3 cup sugar
  3. 2 eggs
  4. 1 teaspoon vanilla
  5. 2 1/4 cups flour
  6. 3/4 teaspoon baking powder
  7. 1/4 teaspoon salt
Glaze:
  1. 3/4 cup confectioners' sugar
  2. 1 tablespoon milk
  3. 2 teaspoon butter, melted
  4. 1 teaspoon almond extract

Directions:
  1. In a food processor, combine the cranberries, cherry preserves, and cinnamon and mix until smooth. I used homemade cherry jam which is a little more thicker than store bought so I added a teaspoon of water as well.
  2. In a large bowl, cream butter and sugar until fluffy. Beat in the eggs and vanilla.
  3. In a separate bowl, combine the flour, baking powder, and salt and gradually add to the creamed mixture.
  4. Divide the dough in half and roll each portion into a 12 inch by 8 inch rectangle on a floured surface.
  5. Spread the filling on both rectangles and roll up jelly style.
  6. Place seam-side down on a lightly greased baking sheet and bake at 325° For 25-30 minutes or until lightly browned.
  7. Carefully transfer the logs to a cutting board and let cool for 5 minutes. With a serrated knife (the knife used to cut bread with the evenly-spaced teeth), cut into 1/2 inch slices. Place on a lightly greased baking sheet again and bake for another 15 minutes or until firm and dry.
  8. In a small bowl, combine the glaze ingredients and drizzle over the warm biscotti. Cool completely and store in airtight container.
  9. Enjoy!


Tuesday, May 7, 2013

Pasta with Creamy Garlic Shrimp Parmesan Sauce!


I really like the shrimp pasta at Red Lobster, and I have created a recipe very similar to it with the help of a traditional shrimp sauce from my mother! As a busy student, wife, and mom, I know how important it is to share dishes that are quick and fast. I hope you have all liked my dishes and they can help you shed some cooking hours to enjoy your time with your family. It is very simple to make and very delicious!

Total time: 30-40 minutes 

You will need:
  • Very soft pasta, about 2 cups (angel hair pasta or egg noodles work well but I personally love the one from the Russian store)
  • About 1 to 2 cups shrimp. I used 2 cups of the Pacific Coldwater Salad Shrimp which is fully cooked and ready to eat. I like it because it is very small and makes more of a sauce texture. If you choose to use raw jumbo shrimp, that's fine too.
  • 3 tablespoons butter
  • 1 teaspoon lemon juice
  • 5 cloves of garlic, peeled and minced with a garlic press. 
  • 2 cups milk (you can substitute 2 cups heavy whipped cream for a more creamier taste but it is less healthy and more fattening)
  • 1 cup Parmesan cheese
  • 2 tablespoons flour
  • 2 tablespoons dried dill weed

Directions:
  1. Cook the pasta in a pot full of boiling water and a pinch of salt for about 5-10 minutes. Drain and put in a serving bowl.
  2. In a pan, melt the butter and add the shrimp with the lemon juice. For the salad shrimp, fry it for less than a minute, just to defrost it. For the raw shrimp, peel it and let it fry just until pink (you do not want to overcook it).
  3. Add the garlic, milk, and Parmesan cheese and let it simmer for about 5 minutes, stirring well.
  4. Add the flour slowly, stirring with each addition of a spoonful. Add the dried dill weed also and stir for about 1 more minute.
  5. When ready to eat, pour the mixture over a serving of pasta and add some toppings (cheese or cut green onion is delicious).


                                                            Enjoy and please comment!


Wednesday, May 1, 2013

Easy Recipe for Funnel Cake!


Whenever I am at the Puyallup Fair or at Wild Waves, I am so tempted by those delicious funnel cakes. Especially with the whipped cream and strawberries on top, yum! Well, now you can make some at home! This is a very easy recipe and it produces about 12 funnel cakes!

Prep time: 10 minutes
Full time: 30 minutes to 1 hour

You will need:
  • A small pot, less than 6in in diameter (mine was 5.5in)
  • Vegetable oil (or grape seed oil for a healthier and yummy smell)
  • A small funnel about 1cm in diameter at the spout
  • 2 cups milk
  • 2 eggs
  • 2 cups flour
  • 1 teaspoon cinnamon
  • 1 teaspoon sugar
  • 1 teaspoon baking soda
  • 1/2 teaspoon salt
  • Powdered sugar, whipped cream, strawberries, bananas, blueberries, maple syrup or anything else you would like for presentation after they are done cooking.
Directions:
  1. Fill the small pan about halfway with oil and let it sit on the stove top on medium heat for at least 5 minutes for the oil to be hot.
  2. In a large bowl, beat eggs and milk together.
  3. In a smaller bowl, mix together the remaining dry ingredients and add them to the milk and eggs. Stir well until smooth.
  4. Once the oil is nice and hot, carefully pour the batter into the funnel with a large spoon and swirl it around in the oil, starting from the center and working in a circle outwards. Since the batter will be so light, it will start to go up in the oil before you are finished swirling. Make sure you swirl from the center outwards equally as best as you can so the funnel cake will hold.
  5. Flip the funnel cake over once it is brown on the bottom side. Once both sides are brown, let the funnel cake sit on paper towels to remove all excess oil.
  6. Decorate with any topping you would like and let them sit on a big plate. Do not let them cover each other and do not put them into a closed container to prevent sogginess. Enjoy!

De-clutter your life! Simple and inexpensive organizing techniques!

Living in a small place with three people is not easy, especially when you hate clutter. I wanted to share tips on how to make things less cluttered, more organized, and better presented. Since I am in the process of organizing, I will add more throughout the week. These are my own personal tips on what I do and I hope you will enjoy.


Tip 1: With the new style of having a different kind of scarf for every kind of outfit, I feel like I have more scarfs than shirts! I used to take a big plastic container and thrown them all in there. The downside? They would get wrinkled, unorganized, and it was time-consuming to dig through them all to find the one you want. Now, I use a simple hanger and tie them on it. One hanger probably hold about 4 to 8 scarfs and it is easier to find with better looking closets. Plus, it takes up less room!


Tip 2: Just when I did not think I could have no more scarfs, I have even more belts. And it doesn't help that every dress, jacket, or shirt comes with one now. But of course I do not throw any away because I justify that they are all cute and will match different outfits. First step: throw the ones you do not need away. Or do some good and give them to those less fortunate. For some of my belts I take a shoebox and roll them  in their neatly. For the ones I use more often or I am afraid to wrinkle, I use special belt clasps that you can buy at any store for cheap and I connect a bunch to one hanger. You can also hang them off an unused key hanger.


My plan it to buy the nicer looking ones for even better presentation. Bed, Bath and Beyond has nice ones, 2 for $10. It works for scarfs as well.


Tip 3: I have recently purchased a tie and belt holder for my husbands various formal attire. I think it is very profitable to spend money on buying a correct organizer for things that take up more room than necessary. I have tried putting them on hangers, various nails, etc. But in the end, this was the best choice. Plus, it is velvet-covered so the cloth does not slip off. And it it so space-saving! I think its time to fill my side of the closet with more clothes now. ;) Another idea is the metal hanger below.  


Tip 4: For shoes, I have a rack to hold two shelves. With my bigger supply of shoes since my daughter is starting to walk, I need more shoe holders that take up less room. I love the over-the-door shoe holders that are available. I prefer the cloth ones over the metal or plastic because they are much more comfortable for me. Even though they have a tendency to bend more than solid ones, I still prefer them for the softness and flexibility.


 There are also under-the-bed shoe holders that are available for even more room. Here is one at Walmart:


Tip 6: A great storage saver in the children's closet are these cloth ones I got at Burlington Coat Factory. They organize all my girl's shirts and pants into one convenient place when I need them so that the dresser isn't overflowing with clothes. I also recently purchased a big storage bin with drawers for blankets and towels that fits perfectly in the closet. And may I say it is also pink :)


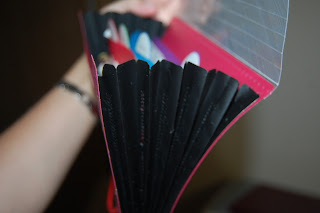
Tip 7: I love couponing, and a simple file organizer can help you organize your different gift cards or coupons to save money. I bought this small organizer from the Target dollar section. It has four compartments which I organized as food, body, cleaning, and other. It is convenient because you can have it in your purse, especially for those quick stops to the grocery store that you were not expecting to make.


Tip 8: These little plastic organizers help in little areas but make a big impact on your storage. I bought a bunch of them for the dollar tree and I use them for various things such as utensils, hair pieces, yarn and needles, pens and pencils, batteries, envelopes and stamps, candles,etc! The possibilities are endless!


Tuesday, April 16, 2013

Recipe For Roasted Organic Duck!


Before meeting my husband, I have never experienced cooking a duck from the farm. My husband's parents have live chickens and ducks that they occasionally cut for us. I must say, I was pretty skeptic of cutting the duck and cooking it straight from the farm. Plus, I did not know if I would like the taste because I had tasted duck before and I was not so accepting of it. However this recipe is very good! It is my mother-in-law's recipe and I would like to share it with you. Live chickens and ducks from the farm typically take much longer to cook than store-bought poultry. Plus, you can cook the whole duck with all its "features" (which means liver, heart, neck, etc.) if you so desire.

You will need:

  • A whole organic duck, cut into pieces. My mother-in-law cuts mine with her special knife and then I have a sharp knife to cut them even smaller when I want to cook them. It is not easy to cut through the bones, so make sure you have a sharp but sturdy knife. (Make sure to rinse very well!)
  • 3-4 tablespoons of oil
  • 1/2 to 1 cup warm water.
  • Vegetables: about 2 carrots, 1/2 of one onion, and 1 large red pepper cut into medium-sized chunks.
  • Seasonings: 1 teaspoon salt, 1 teaspoon black pepper, 1/4 cup chopped dill weed, 1/4cup chopped parsley, one bay leaf, and 2-3 cloves of freshly chopped garlic.
  • About 4-6 potatoes, peeled and sliced into triangular pieces.
Directions:

  1. In a large pan with the 3-4 tablespoons of oil, fry the duck on both sides on medium heat. Fry until it is to desired brownness. Add the water (depending on how big the duck is or how much you use of the duck, the water amount varies, make sure to put enough so you can just barely cover the duck)
  2. Add your cut up vegetables and seasonings to the duck. Cover, and let simmer for 30 minutes on medium-low heat.
  3. Preheat the oven to 350° And arrange the potatoes on a glass baking dish. Pour the duck mixture on top of the potatoes and let it cook in the oven for another 1-2 hours, uncovered until crisp. (A whole farm duck will most likely take 1 1/2 hours, a duck with the insides dumped takes 1 hour, and a store-bought duck will probably take 30 minutes to 45 minutes.
Very simple, yet delicious. Enjoy!


Helpful Home Secrets


I remember reading about these remedies and I would like to share what I have saved and written down. Plus there are some of my own that I think are helpful.

1. Got ink stains? Try milk! The basic milk can help to remove the absorbed stain.

2. Another shocking use of milk: dipping curtains in the liquid will make them look like new.

3. To keep potatoes from budding, place an apple in the bag!

4. Toothpaste has a lot of uses; wash crayon stains off the wall, remove pimples, deflog goggles, clean sneakers and CDs, and my favorite, rinse your hands with toothpaste after handling garlic or onion to remove that awful smell that you get for the whole day! Polish your diamonds to make them shine! Patch up holes in the wall made from nails.

5. Coca Cola might not be so good to drink but it has powerful strength for cleaning! Shine gold and silver by placing it in a cup with coke overnight. It works with coins too! Unscrew a rotting bolt with a coke-soaked cloth. Clean burnt pans by letting them soak for a little. Cleaning the toilet or tile from those hard stains can also help!

 6. Add vinegar and sugar in warm water to prolong the life of flowers in a vase!

7. To remove burnt food from pans, add a little soap and water and boil on stove top for a little while.

8. If you over-salt a dish, add a potato to absorb the salt.

9. Lavender keeps insects away and looks very pretty at an outdoor party or wedding!

10. Keep ants away by drawing with chalk. They will not pass a chalk line!

11. You want to see if an egg is fresh, immerse it in water. If it sink then it is fresh.

12. Add sugar when boiling corn to bring out natural sweetness.

13. Place a small cup of baking soda in the fridge to help with odors.

Anyone have any other helpful home secrets? Please share!

Monday, April 8, 2013

10 Inexpensive Yet Fun Family Dates to go on a Budget!


1. Parks: Parks are my favorite to visit. I love the fresh air and spacious greens. Go to a place with playgrounds so your kids can play while you share a little mommy-daddy time. After we got married and where looking for parks with playgrounds with our kids, we were shocked how many beautiful and well-maintained parks there are in our area! You can find a park where you can swim, fish, fly a kite, or go on hiking trails. Also, you can take your own picnic and enjoy the scenery. The kids can take leftover bread and feed the ducks (in places that are allowed). We have yet to go rent bicycles and explore a park (on my bucket list). By they way mamas, you can incorporate your workout by pushing the heavy strollers around the park. Plus? It's free!!

2. Sightseeing: This is another great thing to do with the family on a sunny weekend. We tend to take for granted the fantastic sights of our home state and focus on other places to see. Why not enjoy your hometown! There is plenty of sights to see. A stop by a local hotel can help you get a brochure and an idea on what to do. I have lived most of my life in Tacoma and I have never enjoyed stroll around Seattle (other then business related) and I am sure many can say the same. Try your best to park in a place where you will not have to pay a fee so you do not have to worry. Take lots of pictures and enjoy the time! Leave sometime to watch the sun go down and marvel at God's creation, not just man-made. Go out there, you might be surprised at what you find and you can remember why you still live in your state!

3. Museums and Zoos: I enjoy visiting these places. Some museums have are shows free of charge to enjoy. And some museums have art outside that you can admire without lifting your wallet. It is best to go early in the morning and then you can get your money's worth by walking around all day. Plus they give discounts for little kids and students. They also give group discounts if you want to take a whole group of families to enjoy the day.  Try to pack water bottles and snacks for the small kids so you will not have to throw your money out on the overly-priced concession stands. For the drooling mouths of the toddlers looking at the cotton candy or popcorn, give them a reward by going out to the store and buying one candy bar or dollar toy before or after.

4. Window Shopping: We have a great time going to various shopping centers and walking around. For more fun, challenge yourselves to go in stores you have never thought to go into. We will go to furniture stores and admire the pieces and go to antique shops to look at different styles. You can drive through a huge housing development. We had mansion homes on tour a couple years back and it was really interesting to see this magnificent homes and the furniture. Later, we go to a pastry and/or ice cream shop to finish off the day. Some shops have family specials that you can ask about to receive discounts.

5. Pet stores: Sounds strange? With the variety of fish and hamsters in various pet stores, The kids will have a blast looking at them. Plus, most major pet stores are located in a shopping centers so you can stop by somewhere without going out of your way. (Bonus, sometimes they have dogs and cats on display for adoption! Who knows, you might even take a furry creature home!)

6. McDonald's Play Area: Even though I am not a fan of fast food, I can not keep the kids away from the brightly-colored tunnels that adorn every block of the city. The happy meals with improvements on health such as milk and apple slices can help mothers who can not keep children away from McDonald's. And salads or wraps for the parents can help monitor that sagging waistline.Going out once in a while to get dollar sundaes and letting your kids play for a while can be fun for them. I do not encourage going often to eat there because what kids grow up with, they will visit in their adult lives. A mother who encourages healthy foods is promoting healthy kids for life!

7. Stay home: Make a fun time at home designated for only family time. You can pick up a local Christian movie to watch with the family (Some of our favorites; Fly Wheel, Fireproof, Courageous, October Baby). Not a fan of movies? Try board games! They are a great way to laugh and connect with the family. You could also bake cookies or cupcakes together for a sweet treat afterwards with hot chocolate out on the porch. Even things to do around the house can be handled all together for more closeness. Things such as painting a room together, arts and crafts, washing the car together, etc!

8. Local Events: There are different types of carnivals or fairs that most likely open once a year in your area. You can afford to splurge once a year and not worry about the cost if you save up. Admissions for children and students is usually free. As a family, decide how many tickets or tokens each of you will get so you spend them wisely and there will be no asking for more. Plus, you will not keep buying tickets at what seems like a low price but builds up in the long run. Buy only what you need at the boutiques. There will be amazing kitchen utensils and make-your-life easier pedicure sets but you need to stop and think if you will ever use them. Some families are determined to take a picture each year at the fair. Maybe start a new tradition if the price is to much to handle. We bought a set of 25 small canvases that you can combine and change the pictures anytime you want, all from your home printer. Now we can take a picture with our camera and come home and print out on a canvas for a bigger, better, and cheaper frame! The food is always a tug on your wallet yet the mouth-watering smells are hard to resist. Try to pick one food stand that your family agrees on and buy a bundle there. It will be cheaper and you can mix it up with different varieties of food for everyone to try.

9. Restaurants: Eating out does not always have to be expensive. If it is done once in a while and in moderation, it is smart dining. You could try a buffet or small cafe. Some restaurants have specials available and some have extra savings if you sign up for their email list. Make sure you do not come to a restaurant starving after not eating all day. Everything on the menu will look good, even things you do not normally order. Order water or tea instead of those fancy drinks with the fruit on the side (except for special occasions like birthdays!) and order only one appetizer for the table. Since you end up taking a to-go box anyway, why not split your meal with the kids? Then you can get dessert. :)

10. Visit a farm or orchard: A great day can include a day at the farm. The kids will have a fantastic time learning about new ways of life that are not typical in the city and you will have fun as well! There are TONS of stuff to do at a farm! Petting farm areas, corn mazes, hay jumping, etc! Go in the late spring when the mamas have their babies to see little chicks and baby goats. Check out your local area, there are farms that give free tours and wagon rides! Some farms let you pick some organic fruits to take home. You might pay more for them then at the store but you get a huge box some of which you can take and freeze them for smoothies or pies later!

Marriage is not something one tries on for size and then decides whether to keep; it is rather something one decides with a promise and then bends every effort to keep -Leon R. Kass

Saturday, April 6, 2013

Recipe for Sweet Dough Braids!

I wanted to post this delicious and simple recipe to all you viewers out there. My husband is not a fan of really sweet desserts so this is a perfect treat with a warm cup of tea that will not override your sweet tooth. They are a hit at parties and tea get-togethers. I hope you will enjoy!

Prep time: 30-45 minutes depending on experience with braids.  Total time: 1 hour 30 minutes
                  Yields approximately 24 cookies.


You will need:

For the dough:
  • 1/2 cup unsalted butter (1 stick of butter)
  • 1/2 cup sugar
  • 1 egg
  • 4 tablespoons sour cream (any kind, I use regular not light)
  • 1/4 teaspoon salt
  • 1/4 teaspoon baking soda
  • 2 1/2 cup flour
For the top decor:
  • The yolk of two eggs in a separate bowl to rub on the braids (discard the egg white)
  • Any kinds of topping you choose, I use crushed walnuts, cinnamon, sugar, and poppy seeds.
Directions:
  1. Preheat oven to 350°.
  2. Mix the dough ingredients in the order they are written, adding 1/2 a cup flour each time you stir. I use my mixing utensil to mix but you can use an electronic mixer if you choose, just not for the flour part.
  3. Roll out the dough on the counter top in a flat ball. Use more flour to cover the counter top and the dough ball as needed.
  4. Cut the dough into four equal pieces and roll the pieces into round log shapes. Cut them into one inch sections. (This part can be hard to explain so I added pictures)


  5. Here comes the hardest part of the recipe, though it is quite easy once you get the hang of it. With your fingers, press the one inch pieces into a flat oval shaped design. Cut two slits in the oval shape two make three even pieces. Make sure to leave some room at the top so it can be connected.
  6. Braid the three pieces together and attach them at the end by pressing tightly. Since the dough will be soft, try to braid without picking up the whole piece but by overlapping each one on the counter top. 
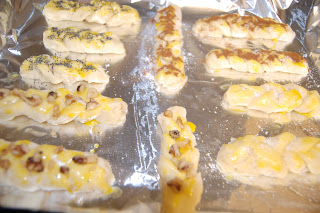
  7. With a pastry brush, rub the egg yolk on top on the braids very lightly. This will help keep your decor on the braids and will give them a nice golden color. Add your toppings!
  8.  Bake in the oven for 18 to 15 minutes or until they are golden brown. Enjoy!