Showing posts with label Recipes. Show all posts

Thursday, September 5, 2013

Easy and Delicious Family Tacos!

These tacos are so good and so simple that they are gone within minutes! They are not Mexican style tacos, they are more of a snack that do not have any spice but plenty of juiciness! My family has been making these for quiet a few years and we all love it!


Prep time: 40 minutes               Cook  time: 3 minutes


You need:
  1. Large Flour Tortillas, 8-10 Count. You can use whole wheat or flour.
  2. 1 pound of ground meat, I like to use ground turkey for extra moistness.
  3. I medium onion chopped into small pieces.
  4. Mayonnaise for spread.
  5. Shredded cabbage or lettuce, whatever you prefer.
  6. 1 large red pepper, chopped into small pieces.
  7. Mozzarella or montery jack cheese, shredded.
  8. Some toothpicks to hold taco together. 

Directions:
  1. Fry the ground meat in a pan with oil, salt, and pepper until brown. Add the chopped onion and saute for another three minutes. Transfer to some paper towels to cool and drain the oil.
  2. While the meat is cooling, spread a layer of mayo on the tortillas.
  3. Add the meat mixture, lettuce or cabbage, pepper, and cheese on top. close the two flaps of the tortilla and hold together with toothpicks is necessary.
  4. Store in the refrigerator with plastic wrap over them. When you're ready to make some, add a small drop of oil to a pan and fry on both sides until brown. You can also cut up in pieces and stick a toothpick in for a great appetizer with a ranch or salsa dip.  But I love to eat them whole! :) Enjoy!


Tuesday, August 13, 2013

Cranberry Swirl Biscotti

I received a wonderful cookbook from my father-in-law as a gift a few months ago. It has so many fantastic recipes, one of which I have included here. It is too good of a recipe not to share! It is made for new cooks and bakers mostly with over 400 recipes. There are helpful sections on everything from how to cut a mango (yes there is a great way to do it!) to how to make rising dough (I have always had trouble with this one!). Plus, the nutrition facts are written down for every recipe. The title of the book is Taste of Home; Cooking School Cookbook. Great for Grads, Newlyweds, and All New Cooks!

These biscotti are so good you will want to take them to all your gatherings, your tea parties, and even wrap them up as gifts! Plus, they are SO easy to make. If I can do it, you can do it. :)

Prep Time: 30-40 min                                  Total Time: 1 hour and 30 minutes


You will need:

Filling:
  1. 2/3 cup dried cranberries
  2. 1/2 cup cherry preserves
  3. 1/2 teaspoon ground cinnamon
Dough:
  1. 1/2 cup butter, softened
  2. 2/3 cup sugar
  3. 2 eggs
  4. 1 teaspoon vanilla
  5. 2 1/4 cups flour
  6. 3/4 teaspoon baking powder
  7. 1/4 teaspoon salt
Glaze:
  1. 3/4 cup confectioners' sugar
  2. 1 tablespoon milk
  3. 2 teaspoon butter, melted
  4. 1 teaspoon almond extract

Directions:
  1. In a food processor, combine the cranberries, cherry preserves, and cinnamon and mix until smooth. I used homemade cherry jam which is a little more thicker than store bought so I added a teaspoon of water as well.
  2. In a large bowl, cream butter and sugar until fluffy. Beat in the eggs and vanilla.
  3. In a separate bowl, combine the flour, baking powder, and salt and gradually add to the creamed mixture.
  4. Divide the dough in half and roll each portion into a 12 inch by 8 inch rectangle on a floured surface.
  5. Spread the filling on both rectangles and roll up jelly style.
  6. Place seam-side down on a lightly greased baking sheet and bake at 325° For 25-30 minutes or until lightly browned.
  7. Carefully transfer the logs to a cutting board and let cool for 5 minutes. With a serrated knife (the knife used to cut bread with the evenly-spaced teeth), cut into 1/2 inch slices. Place on a lightly greased baking sheet again and bake for another 15 minutes or until firm and dry.
  8. In a small bowl, combine the glaze ingredients and drizzle over the warm biscotti. Cool completely and store in airtight container.
  9. Enjoy!


Tuesday, May 7, 2013

Pasta with Creamy Garlic Shrimp Parmesan Sauce!


I really like the shrimp pasta at Red Lobster, and I have created a recipe very similar to it with the help of a traditional shrimp sauce from my mother! As a busy student, wife, and mom, I know how important it is to share dishes that are quick and fast. I hope you have all liked my dishes and they can help you shed some cooking hours to enjoy your time with your family. It is very simple to make and very delicious!

Total time: 30-40 minutes 

You will need:
  • Very soft pasta, about 2 cups (angel hair pasta or egg noodles work well but I personally love the one from the Russian store)
  • About 1 to 2 cups shrimp. I used 2 cups of the Pacific Coldwater Salad Shrimp which is fully cooked and ready to eat. I like it because it is very small and makes more of a sauce texture. If you choose to use raw jumbo shrimp, that's fine too.
  • 3 tablespoons butter
  • 1 teaspoon lemon juice
  • 5 cloves of garlic, peeled and minced with a garlic press. 
  • 2 cups milk (you can substitute 2 cups heavy whipped cream for a more creamier taste but it is less healthy and more fattening)
  • 1 cup Parmesan cheese
  • 2 tablespoons flour
  • 2 tablespoons dried dill weed

Directions:
  1. Cook the pasta in a pot full of boiling water and a pinch of salt for about 5-10 minutes. Drain and put in a serving bowl.
  2. In a pan, melt the butter and add the shrimp with the lemon juice. For the salad shrimp, fry it for less than a minute, just to defrost it. For the raw shrimp, peel it and let it fry just until pink (you do not want to overcook it).
  3. Add the garlic, milk, and Parmesan cheese and let it simmer for about 5 minutes, stirring well.
  4. Add the flour slowly, stirring with each addition of a spoonful. Add the dried dill weed also and stir for about 1 more minute.
  5. When ready to eat, pour the mixture over a serving of pasta and add some toppings (cheese or cut green onion is delicious).


                                                            Enjoy and please comment!


Wednesday, May 1, 2013

Easy Recipe for Funnel Cake!


Whenever I am at the Puyallup Fair or at Wild Waves, I am so tempted by those delicious funnel cakes. Especially with the whipped cream and strawberries on top, yum! Well, now you can make some at home! This is a very easy recipe and it produces about 12 funnel cakes!

Prep time: 10 minutes
Full time: 30 minutes to 1 hour

You will need:
  • A small pot, less than 6in in diameter (mine was 5.5in)
  • Vegetable oil (or grape seed oil for a healthier and yummy smell)
  • A small funnel about 1cm in diameter at the spout
  • 2 cups milk
  • 2 eggs
  • 2 cups flour
  • 1 teaspoon cinnamon
  • 1 teaspoon sugar
  • 1 teaspoon baking soda
  • 1/2 teaspoon salt
  • Powdered sugar, whipped cream, strawberries, bananas, blueberries, maple syrup or anything else you would like for presentation after they are done cooking.
Directions:
  1. Fill the small pan about halfway with oil and let it sit on the stove top on medium heat for at least 5 minutes for the oil to be hot.
  2. In a large bowl, beat eggs and milk together.
  3. In a smaller bowl, mix together the remaining dry ingredients and add them to the milk and eggs. Stir well until smooth.
  4. Once the oil is nice and hot, carefully pour the batter into the funnel with a large spoon and swirl it around in the oil, starting from the center and working in a circle outwards. Since the batter will be so light, it will start to go up in the oil before you are finished swirling. Make sure you swirl from the center outwards equally as best as you can so the funnel cake will hold.
  5. Flip the funnel cake over once it is brown on the bottom side. Once both sides are brown, let the funnel cake sit on paper towels to remove all excess oil.
  6. Decorate with any topping you would like and let them sit on a big plate. Do not let them cover each other and do not put them into a closed container to prevent sogginess. Enjoy!

Tuesday, April 16, 2013

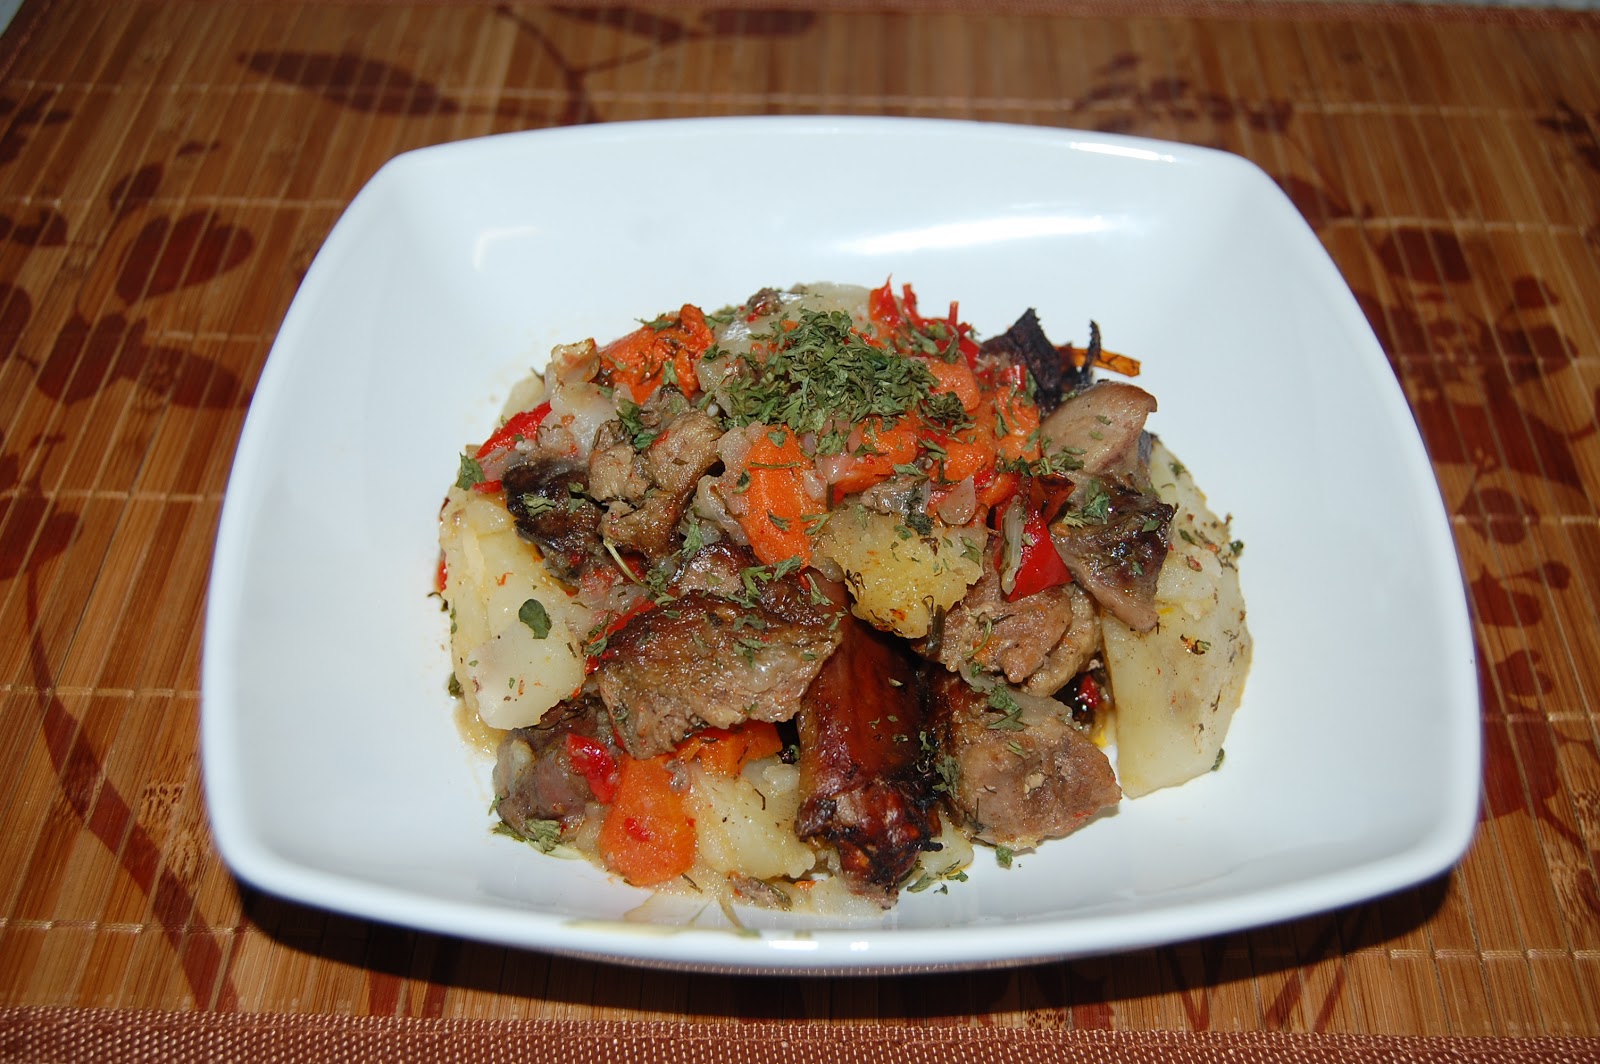
Recipe For Roasted Organic Duck!


Before meeting my husband, I have never experienced cooking a duck from the farm. My husband's parents have live chickens and ducks that they occasionally cut for us. I must say, I was pretty skeptic of cutting the duck and cooking it straight from the farm. Plus, I did not know if I would like the taste because I had tasted duck before and I was not so accepting of it. However this recipe is very good! It is my mother-in-law's recipe and I would like to share it with you. Live chickens and ducks from the farm typically take much longer to cook than store-bought poultry. Plus, you can cook the whole duck with all its "features" (which means liver, heart, neck, etc.) if you so desire.

You will need:

  • A whole organic duck, cut into pieces. My mother-in-law cuts mine with her special knife and then I have a sharp knife to cut them even smaller when I want to cook them. It is not easy to cut through the bones, so make sure you have a sharp but sturdy knife. (Make sure to rinse very well!)
  • 3-4 tablespoons of oil
  • 1/2 to 1 cup warm water.
  • Vegetables: about 2 carrots, 1/2 of one onion, and 1 large red pepper cut into medium-sized chunks.
  • Seasonings: 1 teaspoon salt, 1 teaspoon black pepper, 1/4 cup chopped dill weed, 1/4cup chopped parsley, one bay leaf, and 2-3 cloves of freshly chopped garlic.
  • About 4-6 potatoes, peeled and sliced into triangular pieces.
Directions:

  1. In a large pan with the 3-4 tablespoons of oil, fry the duck on both sides on medium heat. Fry until it is to desired brownness. Add the water (depending on how big the duck is or how much you use of the duck, the water amount varies, make sure to put enough so you can just barely cover the duck)
  2. Add your cut up vegetables and seasonings to the duck. Cover, and let simmer for 30 minutes on medium-low heat.
  3. Preheat the oven to 350° And arrange the potatoes on a glass baking dish. Pour the duck mixture on top of the potatoes and let it cook in the oven for another 1-2 hours, uncovered until crisp. (A whole farm duck will most likely take 1 1/2 hours, a duck with the insides dumped takes 1 hour, and a store-bought duck will probably take 30 minutes to 45 minutes.
Very simple, yet delicious. Enjoy!


Saturday, April 6, 2013

Recipe for Sweet Dough Braids!

I wanted to post this delicious and simple recipe to all you viewers out there. My husband is not a fan of really sweet desserts so this is a perfect treat with a warm cup of tea that will not override your sweet tooth. They are a hit at parties and tea get-togethers. I hope you will enjoy!

Prep time: 30-45 minutes depending on experience with braids.  Total time: 1 hour 30 minutes
                  Yields approximately 24 cookies.


You will need:

For the dough:
  • 1/2 cup unsalted butter (1 stick of butter)
  • 1/2 cup sugar
  • 1 egg
  • 4 tablespoons sour cream (any kind, I use regular not light)
  • 1/4 teaspoon salt
  • 1/4 teaspoon baking soda
  • 2 1/2 cup flour
For the top decor:
  • The yolk of two eggs in a separate bowl to rub on the braids (discard the egg white)
  • Any kinds of topping you choose, I use crushed walnuts, cinnamon, sugar, and poppy seeds.
Directions:
  1. Preheat oven to 350°.
  2. Mix the dough ingredients in the order they are written, adding 1/2 a cup flour each time you stir. I use my mixing utensil to mix but you can use an electronic mixer if you choose, just not for the flour part.
  3. Roll out the dough on the counter top in a flat ball. Use more flour to cover the counter top and the dough ball as needed.
  4. Cut the dough into four equal pieces and roll the pieces into round log shapes. Cut them into one inch sections. (This part can be hard to explain so I added pictures)


  5. Here comes the hardest part of the recipe, though it is quite easy once you get the hang of it. With your fingers, press the one inch pieces into a flat oval shaped design. Cut two slits in the oval shape two make three even pieces. Make sure to leave some room at the top so it can be connected.
  6. Braid the three pieces together and attach them at the end by pressing tightly. Since the dough will be soft, try to braid without picking up the whole piece but by overlapping each one on the counter top. 
  7. With a pastry brush, rub the egg yolk on top on the braids very lightly. This will help keep your decor on the braids and will give them a nice golden color. Add your toppings!
  8.  Bake in the oven for 18 to 15 minutes or until they are golden brown. Enjoy!