Tuesday, May 7, 2013

Pasta with Creamy Garlic Shrimp Parmesan Sauce!


I really like the shrimp pasta at Red Lobster, and I have created a recipe very similar to it with the help of a traditional shrimp sauce from my mother! As a busy student, wife, and mom, I know how important it is to share dishes that are quick and fast. I hope you have all liked my dishes and they can help you shed some cooking hours to enjoy your time with your family. It is very simple to make and very delicious!

Total time: 30-40 minutes 

You will need:
  • Very soft pasta, about 2 cups (angel hair pasta or egg noodles work well but I personally love the one from the Russian store)
  • About 1 to 2 cups shrimp. I used 2 cups of the Pacific Coldwater Salad Shrimp which is fully cooked and ready to eat. I like it because it is very small and makes more of a sauce texture. If you choose to use raw jumbo shrimp, that's fine too.
  • 3 tablespoons butter
  • 1 teaspoon lemon juice
  • 5 cloves of garlic, peeled and minced with a garlic press. 
  • 2 cups milk (you can substitute 2 cups heavy whipped cream for a more creamier taste but it is less healthy and more fattening)
  • 1 cup Parmesan cheese
  • 2 tablespoons flour
  • 2 tablespoons dried dill weed

Directions:
  1. Cook the pasta in a pot full of boiling water and a pinch of salt for about 5-10 minutes. Drain and put in a serving bowl.
  2. In a pan, melt the butter and add the shrimp with the lemon juice. For the salad shrimp, fry it for less than a minute, just to defrost it. For the raw shrimp, peel it and let it fry just until pink (you do not want to overcook it).
  3. Add the garlic, milk, and Parmesan cheese and let it simmer for about 5 minutes, stirring well.
  4. Add the flour slowly, stirring with each addition of a spoonful. Add the dried dill weed also and stir for about 1 more minute.
  5. When ready to eat, pour the mixture over a serving of pasta and add some toppings (cheese or cut green onion is delicious).


                                                            Enjoy and please comment!


Wednesday, May 1, 2013

Easy Recipe for Funnel Cake!


Whenever I am at the Puyallup Fair or at Wild Waves, I am so tempted by those delicious funnel cakes. Especially with the whipped cream and strawberries on top, yum! Well, now you can make some at home! This is a very easy recipe and it produces about 12 funnel cakes!

Prep time: 10 minutes
Full time: 30 minutes to 1 hour

You will need:
  • A small pot, less than 6in in diameter (mine was 5.5in)
  • Vegetable oil (or grape seed oil for a healthier and yummy smell)
  • A small funnel about 1cm in diameter at the spout
  • 2 cups milk
  • 2 eggs
  • 2 cups flour
  • 1 teaspoon cinnamon
  • 1 teaspoon sugar
  • 1 teaspoon baking soda
  • 1/2 teaspoon salt
  • Powdered sugar, whipped cream, strawberries, bananas, blueberries, maple syrup or anything else you would like for presentation after they are done cooking.
Directions:
  1. Fill the small pan about halfway with oil and let it sit on the stove top on medium heat for at least 5 minutes for the oil to be hot.
  2. In a large bowl, beat eggs and milk together.
  3. In a smaller bowl, mix together the remaining dry ingredients and add them to the milk and eggs. Stir well until smooth.
  4. Once the oil is nice and hot, carefully pour the batter into the funnel with a large spoon and swirl it around in the oil, starting from the center and working in a circle outwards. Since the batter will be so light, it will start to go up in the oil before you are finished swirling. Make sure you swirl from the center outwards equally as best as you can so the funnel cake will hold.
  5. Flip the funnel cake over once it is brown on the bottom side. Once both sides are brown, let the funnel cake sit on paper towels to remove all excess oil.
  6. Decorate with any topping you would like and let them sit on a big plate. Do not let them cover each other and do not put them into a closed container to prevent sogginess. Enjoy!

De-clutter your life! Simple and inexpensive organizing techniques!

Living in a small place with three people is not easy, especially when you hate clutter. I wanted to share tips on how to make things less cluttered, more organized, and better presented. Since I am in the process of organizing, I will add more throughout the week. These are my own personal tips on what I do and I hope you will enjoy.


Tip 1: With the new style of having a different kind of scarf for every kind of outfit, I feel like I have more scarfs than shirts! I used to take a big plastic container and thrown them all in there. The downside? They would get wrinkled, unorganized, and it was time-consuming to dig through them all to find the one you want. Now, I use a simple hanger and tie them on it. One hanger probably hold about 4 to 8 scarfs and it is easier to find with better looking closets. Plus, it takes up less room!


Tip 2: Just when I did not think I could have no more scarfs, I have even more belts. And it doesn't help that every dress, jacket, or shirt comes with one now. But of course I do not throw any away because I justify that they are all cute and will match different outfits. First step: throw the ones you do not need away. Or do some good and give them to those less fortunate. For some of my belts I take a shoebox and roll them  in their neatly. For the ones I use more often or I am afraid to wrinkle, I use special belt clasps that you can buy at any store for cheap and I connect a bunch to one hanger. You can also hang them off an unused key hanger.


My plan it to buy the nicer looking ones for even better presentation. Bed, Bath and Beyond has nice ones, 2 for $10. It works for scarfs as well.


Tip 3: I have recently purchased a tie and belt holder for my husbands various formal attire. I think it is very profitable to spend money on buying a correct organizer for things that take up more room than necessary. I have tried putting them on hangers, various nails, etc. But in the end, this was the best choice. Plus, it is velvet-covered so the cloth does not slip off. And it it so space-saving! I think its time to fill my side of the closet with more clothes now. ;) Another idea is the metal hanger below.  


Tip 4: For shoes, I have a rack to hold two shelves. With my bigger supply of shoes since my daughter is starting to walk, I need more shoe holders that take up less room. I love the over-the-door shoe holders that are available. I prefer the cloth ones over the metal or plastic because they are much more comfortable for me. Even though they have a tendency to bend more than solid ones, I still prefer them for the softness and flexibility.


 There are also under-the-bed shoe holders that are available for even more room. Here is one at Walmart:


Tip 6: A great storage saver in the children's closet are these cloth ones I got at Burlington Coat Factory. They organize all my girl's shirts and pants into one convenient place when I need them so that the dresser isn't overflowing with clothes. I also recently purchased a big storage bin with drawers for blankets and towels that fits perfectly in the closet. And may I say it is also pink :)


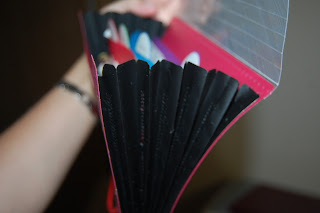
Tip 7: I love couponing, and a simple file organizer can help you organize your different gift cards or coupons to save money. I bought this small organizer from the Target dollar section. It has four compartments which I organized as food, body, cleaning, and other. It is convenient because you can have it in your purse, especially for those quick stops to the grocery store that you were not expecting to make.


Tip 8: These little plastic organizers help in little areas but make a big impact on your storage. I bought a bunch of them for the dollar tree and I use them for various things such as utensils, hair pieces, yarn and needles, pens and pencils, batteries, envelopes and stamps, candles,etc! The possibilities are endless!